
- All
- Product Name
- Product Keyword
- Product Model
- Product Summary
- Product Description
- Multi Field Search
 English
Views: 0 Author: Site Editor Publish Time: 2026-08-03 Origin: Site


A flush, precisely fitted recessed entrance system mitigates liability, prevents trip hazards, and protects interior flooring. Miscalculating even a few millimeters during installation compromises the entire system. Facility managers, contractors, and property owners frequently struggle with uneven substrates, incorrect depth allowances, and selecting the appropriate frame-to-mat ratio. These errors lead to premature wear, acoustic rattling, or drainage failures. This guide provides a technical, step-by-step breakdown of how to prepare a mat well, install the framing system, and fit a door mat. You will learn how to evaluate mat materials and frame types based on specific traffic and structural requirements.
The finished depth of the recess must perfectly match the combined height of the mat and any leveling compound; standard recesses typically range from 12mm to 25mm.
A perfectly level, fully cured, and structurally sound subfloor is required to prevent rigid systems, like aluminum alloy door mats, from flexing, rattling, or failing under heavy rolling loads.
The choice between cast-in-place frames (for new concrete pours) and retrofit angle frames (for existing floors) fundamentally alters the project timeline and labor costs.
Cutting and fitting techniques vary drastically between flexible textile mats and rigid architectural grids; precise templating is required to avoid costly material waste.
Defining the operational demands of the entrance before cutting the substrate dictates the success of the installation. Start by calculating daily foot traffic. Identify the presence of heavy rolling loads, such as pallet jacks, motorized carts, or wheelchairs. You must match these load requirements to the structural crush rating of the chosen mat system. Failing to account for rolling weight causes the structural rails to collapse or bend under pressure. High-traffic commercial buildings often see thousands of crossings daily. This volume demands a rigid, unyielding base and a high-capacity insert.
When evaluating load capacity, consider the point load exerted by hard-wheeled carts. A standard textile mat compresses under these loads, creating a temporary depression that impedes wheel movement. Rigid systems distribute this weight across their aluminum rails. You need to verify the manufacturer's rolling load specifications before finalizing your selection. If the entrance handles freight deliveries, upgrade to a heavy-duty architectural grid.
Evaluating Aluminum Alloy Door Mats makes sense for high-traffic commercial environments. They offer high durability and a rigid structure. However, they require absolute substrate flatness. Conversely, heavy-duty textile or rubber inserts suit medium-traffic or retrofit applications better. They remain more forgiving on slight substrate imperfections and prove easier to cut on-site.
Material Type | Best Application | Substrate Tolerance | Installation Difficulty |
|---|---|---|---|
Aluminum Alloy Grid | High traffic, heavy rolling loads, airports, malls | Zero tolerance (must be perfectly flat) | High (requires specialized cutting tools) |
Heavy-Duty Textile | Medium traffic, offices, retail boutiques | Low tolerance (can absorb minor variations) | Medium (cut with utility knife) |
Interlocking Rubber Tiles | Exterior vestibules, wet environments | Medium tolerance | Low (snap together and trim) |
Calculate the total recess depth by adding the mat thickness, frame thickness, leveling compound, and adhesive. Verify that the installed mat will sit exactly flush with the surrounding finished floor level. This compliance meets accessibility standards. A lip of even two millimeters creates a trip hazard and violates safety codes. Measure the depth at multiple points across the entrance. Concrete slabs rarely pour perfectly flat. You will likely find high and low spots that require adjustment.
Standard recess depths range from 3/8 inch to 1-1/8 inches. If you are retrofitting an existing shallow recess, you must select a low-profile mat system. Attempting to force a thick mat into a shallow well results in a raised surface. Conversely, placing a thin mat in a deep well requires excessive leveling compound, increasing material costs and curing times.
Equip your team with the right machinery and safety gear. Proper tools prevent material waste and ensure precise cuts. You cannot install architectural matting with basic hand tools.
Mitre saw equipped with a carbide-tipped non-ferrous blade for cutting aluminum rails and frames.
Heavy-duty utility knives with plenty of replacement blades for trimming textile inserts.
Angle grinder with a diamond cup wheel for knocking down high spots in the concrete substrate.
Laser level and long straight edges (6-foot to 10-foot) to verify subfloor flatness.
Notch trowels and mixing paddles for applying self-leveling underlayment and adhesives.
Proper safety equipment is mandatory. Provide hearing protection, respiratory masks for silica dust during substrate chipping, and cut-resistant gloves. Aluminum edges become razor-sharp after cutting. Always deburr the cut ends before handling the mat sections.
Ensure compliance with ADA standards for floor surfaces and local fire safety codes. Commercial interiors generally require Class Bfl-s1 fire ratings. Confirm these specifications with the manufacturer before finalizing the material order. Building inspectors will check the transition between the mat and the finished floor. Any vertical change in level exceeding 1/4 inch requires a beveled transition, which defeats the purpose of a recessed system. Aim for a zero-tolerance flush finish.
The physical preparation of the floor represents the most common point of failure in recessed mat installations. For concrete floors, use saw-cutting and chipping techniques to remove existing material. Mark the perimeter using a chalk line and a laser level. Score the concrete with a walk-behind saw or a handheld cut-off saw to establish a clean boundary. Use a demolition hammer with a wide chisel bit to chip out the interior concrete to the required depth. Do not over-excavate, as this requires more leveling compound later.
For wood or raised floors, reinforce the joists and install a recessed plywood sub-base. Standard plywood deflects under heavy foot traffic. Use at least 3/4-inch exterior-grade plywood. Block between the joists to provide continuous support along the perimeter of the recess. Secure the plywood with construction adhesive and deck screws to prevent squeaking.
Test the concrete slab for moisture emissions before applying levelers or adhesives. High moisture levels cause subfloor delamination and mold growth beneath the mat. Use in-situ relative humidity (RH) probes to get an accurate reading of the moisture within the slab. Surface tests do not provide enough data for commercial installations.
Apply epoxy damp-proof membranes where hydrostatic pressure is present. Roll the epoxy over the chipped concrete and allow it to cure fully. Broadcast silica sand into the wet epoxy to create a mechanical bonding profile for the self-leveling underlayment. Skipping this step on grade-level slabs guarantees future failure.
Apply self-leveling underlayment (SLU) or fiber-reinforced rapid-setting screeds to achieve a perfectly flat surface. The industry standard requires a tolerance of 1/8 inch over 10 feet. Mix the SLU exactly according to the manufacturer's water ratio. Pour the material into the recess and use a gauge rake to spread it evenly. Use a spiked roller to release trapped air bubbles and smooth the surface.
Allow adequate curing times and conduct a final moisture test prior to frame installation. Uneven bases cause rigid mats to flex and eventually break. If you notice any low spots after the SLU cures, apply a feather-finish patching compound to bring the surface up to grade. Sand the patch smooth before proceeding.
Evaluate the need for a drained mat well in exterior or highly exposed entrances. Install drain pans, weep holes, and apply waterproof membranes to protect the surrounding subfloor from moisture migration. Standing water degrades both the mat components and the building structure. If you install a drain, slope the bottom of the recess slightly toward the drain body. Ensure the mat supports can accommodate this slope without causing the walking surface to tilt.
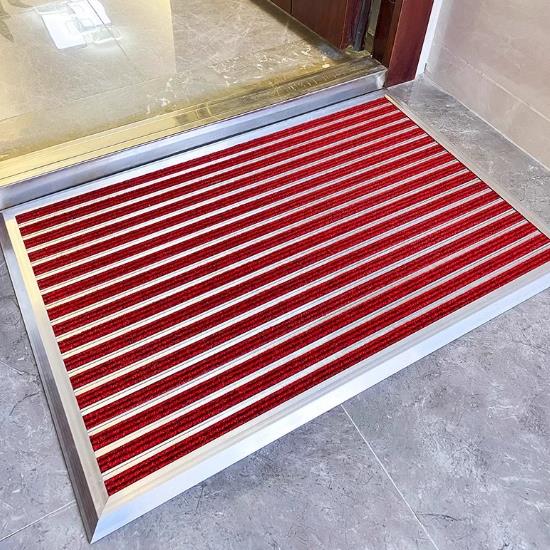
Choosing and securing the boundary that holds the Recessed Entrance Mats in place requires matching the frame type to the floor condition. Cast-in-place frames work best for new construction. You embed them directly into wet concrete using attached anchor legs. This method provides the strongest structural boundary. Surface-mounted or retrofit frames suit existing floors. You mechanically fasten or adhere them to the prepared recess edge.
When using retrofit frames, ensure the vertical leg of the angle matches the depth of your finished recess. If the frame is too tall, it will protrude above the finished floor. If it is too short, the mat will sit below the floor level. Always verify dimensions before cutting the aluminum stock.
Assemble and position the frame inside the prepared well before applying any adhesive or anchor bolts. This dry run verifies the fit, ensures the corners align perfectly, and confirms the leveling alignment matches the surrounding floor. Use a rubber mallet to tap the frame sections together. Check the diagonals with a tape measure to ensure the frame is perfectly square. A frame out of square makes fitting the mat impossible.
Cut aluminum frames using a carbide-tipped non-ferrous blade. Achieve precise 45-degree mitered corners for a seamless architectural finish. If the entrance features non-90-degree irregular geometric corners, use a sliding bevel gauge to transfer the exact angle to your saw. Cut slowly to prevent the aluminum from warping or melting.
Secure the frame using countersunk masonry anchors. Drill pilot holes through the frame and into the concrete substrate. Use a countersink bit on the aluminum so the screw heads sit perfectly flush. Protruding screw heads will interfere with the mat seating properly, causing it to lift at the edges. Apply a bead of construction adhesive under the frame before driving the anchors for added stability.
Calculate thermal expansion allowances for aluminum frames in environments with significant temperature fluctuations. Aluminum expands and contracts with heat. Leave a small gap (typically 1/16 inch) at the mitered corners if the entrance experiences direct sunlight. Fill this gap with a color-matched polyurethane sealant.
If building expansion joints run directly through the entrance mat well, accommodate them by splitting the frame and mat system along the joint line. Never bridge an expansion joint with a rigid aluminum frame. The building movement will shear the anchors and buckle the frame. Install two separate frames meeting at the joint, allowing them to move independently.
Create a rigid template for irregular or non-rectangular entrances, such as revolving doors or curved vestibules. Use heavy construction paper or thin hardboard. Scribe the exact shape of the recess onto the template material. Cut the template and test fit it inside the frame. Account for the manufacturer-recommended clearance gap, usually 1 to 2 millimeters, between the mat edge and the frame. This gap allows for easy removal and routine cleaning.
Transfer the template shape to the back of the matting material. Double-check your orientation before making any cuts. Once you cut a custom shape, you cannot add material back. Measure twice, cut once.
Ensure the scraping direction of textile inserts is oriented perpendicular to the path of traffic for maximum dirt removal. The wiping action works best when pedestrians walk across the ribs, not along them. Align multi-part mat segments carefully to maintain a uniform structural pattern and grain appearance across the entire entrance.
When installing modular aluminum systems, ensure the hinge mechanisms run perpendicular to the traffic flow. This orientation prevents the hinges from spreading under heavy rolling loads. It also allows the mat to roll up easily for maintenance.
For textile or rubber mats, use a heavy-duty utility knife and a straight edge. Cut from the back of the material to ensure a clean edge and prevent the blade from wandering along the surface texture. Make multiple shallow passes rather than trying to cut through the entire thickness in one go. This technique yields a straighter, cleaner cut.
For aluminum systems, disassemble the modular hinges or cables first. Cut the individual aluminum rails with a specialized saw equipped with a non-ferrous blade. Reassemble the rails using the connecting cables or vinyl hinges. Crimp the ends of the cables securely to prevent the mat from separating during use.
Integrate recessed lifting cups or keyholes into heavy or large aluminum systems. These accessories facilitate safe extraction during cleaning cycles. They prevent damage to the frame and reduce strain on maintenance personnel. Position the lifting points near the corners of the mat sections. Ensure they sit flush with the walking surface to avoid creating trip hazards.
Roll the mat into the recess and verify flush transitions across all four sides. Conduct a walk-test to check for movement, shifting, or acoustic issues. The mat should feel solid underfoot with zero rattling. Step heavily on the corners and edges. If you detect any deflection, remove the mat and inspect the substrate for low spots. Correct any issues immediately before turning the entrance over to the client.
If the mat rocks or rattles when walked on, the substrate remains uneven. Remove the mat and apply localized feather-finish patching compounds to the low spots. Use a straight edge to identify the exact location of the depressions. Alternatively, utilize manufacturer-supplied acoustic rubber underlayment strips. Place these strips under the aluminum rails to absorb minor variations and eliminate noise.
Symptom | Root Cause | Mitigation Strategy |
|---|---|---|
Metallic rattling sound | Uneven concrete substrate | Apply feather-finish patch or rubber underlayment |
Mat edges lifting | Protruding frame anchor screws | Countersink screws deeper into the frame |
Frame buckling | Bridged expansion joint | Cut frame at joint line and allow independent movement |
Mat difficult to remove | Insufficient clearance gap | Trim 1-2mm from the mat perimeter |
Retrofit frames bend or detach from the substrate under heavy rolling loads if improperly supported. Ensure zero voids exist beneath the frame lip during the screeding process. Pack mortar or epoxy tightly under the frame to provide solid backing. Use structural epoxy in addition to mechanical fasteners to create a rigid, unyielding bond between the frame and the concrete.
Vinyl or rubber hinges shrink over time, leaving unsightly gaps between the mat sections. Allow all materials to acclimate to the building's HVAC environment for 24 to 48 hours prior to final cutting and fitting. Unroll the mats and lay them flat in the lobby. This stabilization period prevents post-installation dimensional changes. Never install cold vinyl mats directly off a delivery truck.
Fitting a recessed entrance system demands precision engineering and careful substrate preparation. While basic textile mats in pre-formed recesses suit maintenance teams, installing aluminum alloy systems or cutting new recesses into concrete requires specialized contractors. Base your mat and frame selection on existing floor depth, traffic type, and substrate condition.
Measure your exact entrance dimensions and verify the depth of any existing recess using a laser level.
Assess the structural integrity and moisture levels of your subfloor before ordering materials or beginning demolition.
Consult with a manufacturer to specify the correct frame and mat combination for your specific rolling load requirements.
Schedule installation during low-traffic hours to allow leveling compounds and epoxies to cure fully without interruption.
A: Standard recess depths typically range from 12mm to 25mm. The exact depth must perfectly match the combined thickness of your chosen mat, the frame, and any leveling compound used to prepare the subfloor.
A: Yes, but you must cut and remove the tile to create the well, or build up the surrounding floor. You cannot simply place a recessed frame on top of tile without creating a trip hazard.
A: Disassemble the modular connecting cables or hinges first. Cut the individual aluminum rails using a mitre saw equipped with a carbide-tipped non-ferrous blade, then reassemble the mat to the required dimensions.
A: Exterior mats or those exposed to heavy rain and snow benefit greatly from a drained mat well. Interior mats in climate-controlled vestibules typically do not require dedicated drainage, provided they are cleaned regularly.
A: Leave a 1mm to 2mm clearance gap around the entire perimeter. This small tolerance allows the mat to be easily lifted for cleaning while preventing it from shifting excessively under foot traffic.
A: Rattling indicates an uneven substrate. Remove the mat and level the base using a feather-finish patching compound. You can also apply acoustic rubber underlayment strips to absorb impact and eliminate noise.